Getting Started
Overview
This plug-in allows you to export images from Adobe's Photoshop Lightroom directly into your Shutterfly account. It was developed using Shutterfly's Open API, but is in no other way affiliated with Shutterfly. Please don't ask Shutterfly if you have questions about, or problems with, this plug-in -- they won't have a clue what you're talking about.
Compatibility
This plug-in was developed and tested on Windows, but should work fine on a Mac (please let me know if that's not the case!). It is compatible with Lightroom versions 2, 3, 4, and 5.
In addition to operating as a traditional export plug-in, Shutterfly Upload now includes support for Lightroom's Publish Service paradigm when running on Lightroom version 3 or greater. Publish Service capabilities are limited to image uploads due to constraints imposed by the Shutterfly Open API.
Terms of Use

This plug-in is provided for your use, free of charge. However, if you find it useful, feel free to buy me a beer to encourage maintenance and future development!
Contact
If you have questions, comments, or problems, post a comment on the Feedback page and I'll do what I can to help. Be sure to include the plug-in's version and build stamp (found in the plug-in's "Status" section of the Plug-in Manager), error messages you received, or log file if applicable.
Installation and Configuration
Installation
In brief, installation of the plug-in is as easy as downloading the plug-in "zip" archive, unpacking it to a location of your choice, then telling Lightroom where it lives. Here's the detailed version:
- Download the plug-in as a zip file.
- Unzip the contents of the zip file to a location of your choice. Be sure that the internal folder structure is preserved (the plug-in contents should all be inside of a folder that ends with ".lrplugin" or ".lrdevplugin"). Check your zip tool documentation to see what you need to do.
- Start Lightroom, and launch the Plug-in Manager by either selecting "File > Plug-in Manager...", or by pressing the "Plug-in Manager..." button on the Export Dialog.
- Click the "Add" button, locate the directory that you unzipped,
above (it will end with ".lrplugin" or ".lrdevplugin"), and press "OK" on
Windows or "Add Plug-in" on Mac.
- You may be prompted to update your catalog if this is the first time that you've
installed Shutterfly Upload. Press "Update Catalog". (Note: depending
upon the version of Lightroom you're running, you may see a slightly different confirmation
dialog than what's pictured below.)
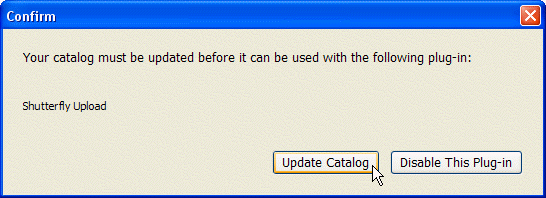 Shutterfly Upload saves information about your uploads in your catalog.
 - Press "Done", and you'll be good to go!
Plug-in Manager
As with most Lightroom plug-ins, maintenance and global configuration of the Shutterfly Upload plug-in takes place in Lightroom's Plug-in Manager dialog. The Plug-in Manager is launched by selecting "File > Plug-in Manager...". It may also be accessed by pressing the "Plug-in Manager..." button found on the export dialog.
In addition to being able to set plug-in specific options, the Plug-in Manager provides services common to all of your plug-ins:
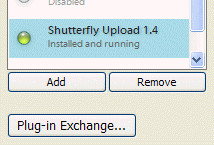
- add or remove plug-ins,
- "at a glance" list of your installed plug-ins, with an idea of their current status ("Installed and running", "Disabled", "Incompatible", etc.),
- shows you a plug-in's installation location, version number, gives you the ability to disable or enable it (found in the plug-in's "Status" panel),
- lets you reload a plug-in, without restarting Lightroom, after making configuration changes, and view error diagnostics that my help troubleshooting bugs (found in the "Plug-in Author Tools" panel),
The Shutterfly Upload plug-in also has a handful of plug-in specific configuration options, found in the "Shutterfly Upload Global Settings" panel:
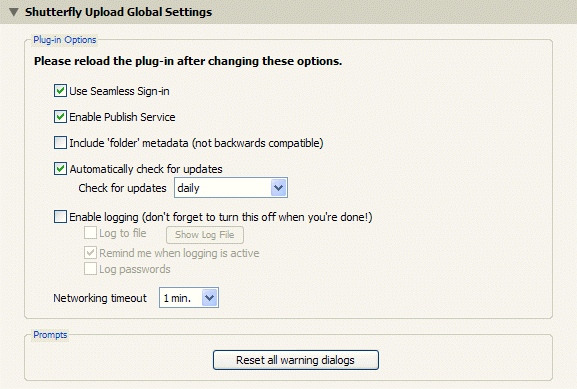
- Use Seamless Sign-in
Check the box to use the one-time-per-Shutterfly-user application authentication method offered by the Shutterfly OpenAPI. If not checked, standard user ID/password authorization will be used.
For first-time installations of the Shutterfly Upload plug-in, this option will be enabled by default. For update installations, this option will be turned off to match the behavior of earlier versions of the plug-in. However, if you trust those who have access to your computer, it's recommended that everyone enable this option.
For ease of use, enable this option. - Enable Publish Service
Check the box to enable the plug-in's publish service and have Shutterfly Upload appear in the Publish Services panel of Lightroom's Library module. This option is not shown on Lightroom version 2.x. - Include 'folder' metadata (not backwards compatible)
Check the box to include the Shutterfly 'folder' name in Lightroom's plug-in Metadata display for images exported to Shutterfly. Once this option is enabled, and your catalog is updated, you will not be able to use older versions of the Shutterfly Upload plug-in. If you're upgrading from a previous release of the plug-in, please do not enable this option until you're certain that you won't need to go back. - Automatically check for updates
Check the box to have the plug-in periodically check for updates. When notified that an update is available, you will need to download and install it manually. You can also check for an update at any time by selecting "Help > Plug-in Extras > Shutterfly Upload > Check for update" from Lightroom's main menuing system. - Enable logging
Check the box to turn on the plug-in's debug logging facility. Turn this on only when you are troubleshooting a problem you may be having using the plug-in. Once enabled, a few sub-options become available:
- Log to file
Check the box to send the logging information to a file. Most plug-in users will want to log to a file. The file will be named ShutterflyUpload.log, and located in your "Documents" folder (the actual location dependent on your operating system platform). If a log file currently exists, click on the "Show Log File" to show you where the file is located. - Remind me when logging is active
Check the box if you would like the plug-in to remind you when you have activated logging. When activated, a reminder window will be displayed at Lightroom startup, and whenever the plug-in is reloaded. - Log passwords
Check the box if you want your Shutterfly account passwords to appear in plain text in the log file. While not normally needed, this option may be helpful in troubleshooting logon problems to Shutterfly.
Note: every effort has been made to ensure that your passwords will not appear in the log file unless this option is enabled, however, there are no guarantees. If you're concerned about divulging your password, please scan or search the log file before sharing it with anyone.
- Log to file
- Networking timeout
If you experience frequent timeout errors with Shutterfly, try increasing this value. The larger the number of albums you have, the larger the timeout value you'll need for satisfactory results. - Reset all warning dialogs
Press the button to reset any of the plug-in's warning dialogs where you checked the "Don't show again" option. This button is not available when running on Lightroom version 2.x.
Updates
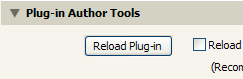
To update to a different version of the plug-in, simply follow the Installation instructions, above. The installation zip file is designed to be unpacked directly over the top of an existing installation of the plug-in. The easiest way to update is to unzip the contents to the same place you did initially, then restart Lightroom or reload the plug-in from the Plug-in Manager.
When you install an update, a "Confirm" dialog may pop up to let you know that the
Shutterfly Upload plug-in "... needs to update the catalog ...." The
plug-in uses your catalog you keep information about your uploads so you can find them
later if you need to. Press "Update Catalog" to dismiss the dialog.
Please be aware that if you receive the "...needs to update..." dialog when updating from an older version of a plug-in (any plug-in, not just Shutterfly Upload), agreeing to perform the update will make it impossible to use the older plug-in again (on that catalog, anyway). Make sure you won't need to back up to the older version before you update your catalog (of course, you won't be able to use the newer version until you do).
You may also install an update along side of an existing installation, making it easy to return to the original version if you want to. If you want to go this route, follow the installation instructions, above, but be sure to unzip the file to a new location.
Lightroom will detect that you're installing a newer version of the plug-in and disable the older copy. If you want to switch back, use the Plug-in Manager to "Enable" the older version (Lightroom will automatically "Disable" the newer one).
When you decide which version you want to keep, you can use the Plug-in Manager to "Remove" the other one from Lightroom, but the plug-in files will remain in your file system, right where you put them. You'll need to delete the files manually if you want to remove them from your machine.
Export Dialog
Starting an Export
Choose the images that you'd like to export to Shutterfly, then select "File > Export..." from Lightroom's menu. This will open Lightroom's Export Dialog.
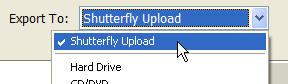
Once the plug-in has been installed, "Shutterfly Upload" will be available as an export target in the Export Dialog. Click on the "Export to:" pop-up menu at the top of the window and select "Shutterfly Upload" from the list. If you are still running Lightroom version 2.x, click anywhere on the banner image located near the top of the Export dialog, then select "Shutterfly Upload" from the menu that appears.
Export Options
There are three settings groups in the Export Dialog that are specific to the Shutterfly Upload plug-in. Several others are owned by Lightroom itself and control how your images are rendered before export. There may be still others contributed by other filter plug-ins that you've installed. These are the sections pertaining to Shutterfly Upload:
- Shutterfly Account (seamless sign-in enabled)
If seamless sign-in is enabled in the plug-in settings, you'll see this view:
 Select the account to use from the list.
Select the account you want to export your pictures to by picking it from the list.
To make a new Shutterfly account available for exporting to, press the "Authenticate..." button. This will open your browser to a special page on Shutterfly's web site that will allow you to authorize the Shutterfly Upload plug-in access to your account. Once permission is granted, and until it is revoked, Shutterfly Upload will be able to export to the account without requiring any explicit log in.
To update the user information associated with the selected account (for example, the name or email address), press the "Refresh" button. Press this button after making changes to your account settings on Shutterfly's web site.
To remove the selected account from the list, press the "Delete" button. Once an account is deleted, you will need to re-authenticate it (or turn off seamless sign-in) before Shutterfly Upload will be able to export to it. To revoke your authorization to access the account, visit your Partner Applications page on Shutterfly's web site.
- Shutterfly Account (seamless sign-in not enabled)
If seamless sign-in is not enabled in the plug-in settings, you'll see this view:
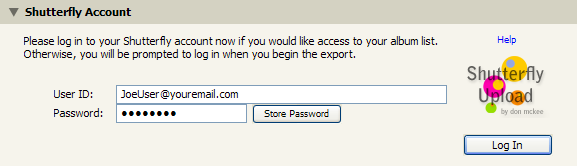 Enter your Shutterfly user ID and password.
This is where you may enter your Shutterfly user ID and password. If you would like to have access to your Shutterfly album list, enter your credentials and press the "Log In" button. If you aren't logged in to Shutterfly prior to starting your export, you will be prompted for your user information.
You have the option of saving your password for later use. This can be especially handy if you create Export Presets and make use of Lightroom's "Export with Preset" option! Passwords are stored in Lightroom's built-in secure password facility. Note: the secure storage facility was introduced in Lightroom version 3. If you're still running version 2.x, your password will be "obfuscated" before storing to prevent it from being seen by prying eyes. Saved passwords are available for use by normal exports, exports initiated with a preset, and for publish service updates.
To save your password, enter your user ID and password, then press the "Store Password" button that will appear next to the password field. Whenever you enter an ID that has a stored password associated with it, the password field will automatically be filled in.
If a user ID has a stored password associated with it, the button next to the password field will change to "Remove Password" (but only if you haven't changed the password being displayed). Press it, and your password will be removed from secure storage.
To change your stored password, enter your user ID and your updated password. The button next to the password field will change to "Update Password". Press it, and your updated password will be saved.
- Shutterfly Folder and Album
 Select your target Shutterfly album.
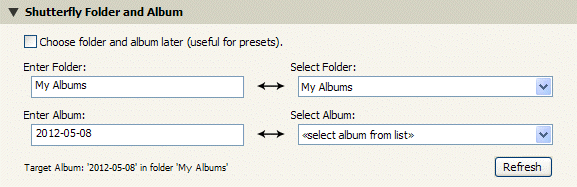
This section is used to pick the Shutterfly album that your images will be exported to. New with this version of Shutterfly Upload, you now also have the option of specifying the Shutterfly folder the album will live in (in prior versions, new albums were always created in your default folder, usually called "My Albums").
You may enter the folder and/or album manually in one of the "Enter ...:" fields, or pick an existing folder and album from the "Select ...:" pop-up menus. The selection menus will be enabled once you've logged in to or selected an authenticated account in the "Shutterfly Account" section, and your album list has been successfully retrieved from Shutterfly. The "Select Album:" menu will be enabled if the selected folder contains albums.
The folders and albums in the selection menus are listed in the same order as they are displayed on the Shutterfly web site. By default, the folders and albums are listed in the order they were created, newest first. However, the Shutterfly web site allows you to change the order if you want to. Just drag-and-drop a folder or album item to a new position in the list.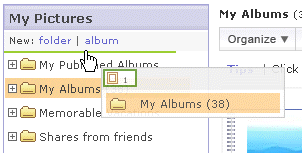 Drag-and-drop on Shutterfly to reorder folders or albums.
Press the "Refresh" button to grab a new copy of your folder and album lists, if, for example, you've made changes to your albums on the Shutterfly web site.
If you'd prefer to delay choosing an album until your export begins, check the box for "Choose folder and album later". This option is especially useful when used in Export Presets.
If you don't provide a folder name, your default folder (usually "My Albums") will be used. If you don't provide an album name, today's date will be used as a default name (e.g. "2012-05-08"). The "Target Album: ..." prompt at the bottom of the display serves as a reminder of the export destination.
- Post-processing
There are three actions to choose from that can be performed once your export completes: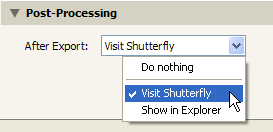 Choose what to do when your export finishes.
- Do Nothing
I guess this would be better termed an "inaction". - Visit Shutterfly
Open the Shutterfly album export target in your web browser. - Show in [Explorer | Finder]
Show the exported images in Explorer (Windows) or Finder (Mac). This choice is only available if you chose something other than "Temporary folder" in the standard "Export Location" section.
- Do Nothing
As mentioned above, several configuration sections belong to Lightroom itself and affect how your images are rendered prior to exporting them. I'll touch on a few that are of particular importance when exporting to Shutterfly:
- Export Location
This section is used to specify where to put your rendered images prior to exporting them to Shutterfly. Under normal circumstances, select "Temporary folder (will be discarded upon completion)" from the "Export to:" pop-up menu. If for some reason you need the rendered copies of your images to remain after the export completes, choose one of the other locations. - File Settings
This section allows you to control the amount of JPEG file compression that is applied to your images via the "Quality" slider. A lower setting results in smaller files (and faster upload times), but at the expense of image quality. But be forewarned: high quality settings can result in very large files (even larger than the original), with no appreciable increase in image quality! Experiment with quality to get an acceptable tradeoff. A larger quality setting is not always better!
You'll have to experiment to figure out the best value to use for your images given your upload bandwidth. Start with a "quality" value in the mid 70's and tweak to taste. For an interesting article about the tradeoff between image size and quality, take a look at Jeffery Friedl's "An Analysis of Lightroom JPEG Export Quality Settings". The article contains several interactive samples that will make you question whether a large "quality" value is really the right answer.
The Shutterfly Upload plug-in forces the export "Format" to "JPEG", and "Color Space" to "sRGB" to match Shutterfly's image requirements.
Note: earlier versions of Lightroom sometimes allowed the user to change the "Format" and "Color Space" settings regardless of what the plug-in requested. If your version of Lightroom allows you to change these options, be sure you select "JPEG" and "sRGB" for files destined for Shutterfly. - Image Sizing
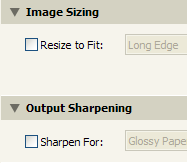 Don't resize or sharpen now for more options later.
This section allows you to resize your images to something different than your originals. Unless you know better, you should generally uncheck the "Resize to fit:" box to give yourself more options once your images are on Shutterfly. - Output Sharpening
Normally, if the images are destined for printing, you'd check the "Sharpen for:" box and select one of "Glossy Paper" or "Matte Paper" from the pop-up menu. However, sharpening here only makes sense if the image is the exact size required for the size of print you're printing (for example, for a 4x6 inch print, printed at 300 pixels per inch, the image would be sized at 1200x1800 pixels). If your image needs to be resized by Shutterfly for printing, the sharpening will either be lost (if the image is reduced in size), or exaggerated (if the image is enlarged). Therefore, unless you know better, you may be better off leaving "Sharpen for:" unchecked.
Export Presets
Creating and using export presets are a handy way of streamlining your workflow. A preset is just a way of remembering your often used export settings, and applying them quickly while setting up for your export. Using a preset, you can even initiate an export without passing through Lightroom's Export Dialog!
To create a preset, first open the Export Dialog ("File > Export..."). Set up the options the way you want them and press the "Add" button (found on the left side of the dialog, under your preset list). Give your preset a name, select the folder it will be grouped in, then press "Create". Your preset will appear in the list! To use a preset to fill in your options for you, just select it from the list. If you don't want to start an export at this time, press the "Cancel" button.
You may also use a preset to start an export directly from Lightroom's menu system, without first visiting the Export Dialog. To do that, select "File > Export with Preset", and choose the preset you want to use from the list. If necessary, you will be prompted to enter your Shutterfly account information, and/or folder/album names.
Publish Service
Overview
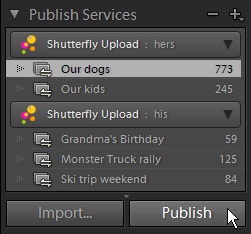
The Publish Services facility in Lightroom version 3 and greater allows you to export a collection (or smart collection) of photos to Shutterfly. After setting up the service, exporting is as easy as adding your images to your published collection, selecting it in the Library module, and pressing the "Publish" button to start your export! All of the settings specified when the publish service was created (Shutterfly user ID and album, rendering options like file size and quality, etc.) are applied, without any more interaction required from you during export. If any images in the collection change later, perhaps after doing some additional editing, Lightroom will re-export them at the push of the "Publish" button (but see limitations, below).
You may have one or more Shutterfly Upload publish services defined. Each service defines the particular export options that will be used when any of the images in the service are published (or, exported) to Shutterfly. Some of these options may be changed later (e.g. file size, quality, etc.), but some may not (e.g. Shutterfly account, export location).
Each service may contain one or more published collections (or smart published collections). Each published collection is associated with the particular Shutterfly album that was specified when it was created. The initial collection is defined as part of the publish service creation.
Limitations
There are several capabilities that are available to Lightroom publish services that are not implemented by the Shutterfly Upload plug-in due to limitations imposed by Shutterfly's Open API:
- No image update
Images that are re-published to Shutterfly are duplicated in your Shutterfly album, not replaced. You'll need to visit the Shutterfly web site to delete any obsolete images. If images are marked for re-publishing by Lightroom, the Shutterfly Upload plug-in will give you the option of skipping them. - No image deletion
Images that are removed from a publish collection, or removed from Lightroom, are not deleted from your Shutterfly album. You'll need to visit the Shutterfly web site to delete any unwanted images. - No comments
Lightroom's publish service comment facility is not available to images published using the Shutterfly Upload plug-in. - No album renames performed
Changing the name of a publish collection will not trigger a rename of your Shutterfly album. - No album renames detected
If you rename your album on Shutterfly's web site, the change will not be detected by the Shutterfly Upload plug-in, and the old album name will be used the next time a collection configured with that name is published. The Shutterfly Upload plug-in allows you to reassociate a publish collection with an existing album to handle this situation.
Create a Publish Service
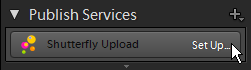
To create your first Shutterfly Upload publish service, locate Shutterfly Upload in Lightroom's Publish Services panel in the Library module, and click on "Set Up..." to start the Lightroom Publishing Manager.
The Lightroom Publishing Manager dialog looks and operates similarly to the Export dialog. Specify the options that will be used for all images published by this service. The Shutterfly folder and album that you specify here will be used to create your initial publish collection for this service. When everything is set up the way you want, press the "Save" button.
If you need help with the configuration options available, refer to the discussion about the Export dialog options. You must enter folder name, album name, and select a Shutterfly account (or enter a Shutterfly user ID if seamless sign-in is not enabled) before the "Save" button will be enabled. If the folder and/or album you select does not exist on Shutterfly, it will be created for you the first time you publish photos using the publish service.
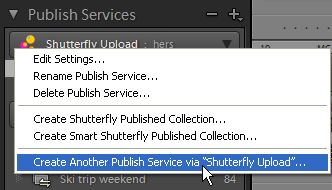
To create additional Shutterfly Upload publish services, right-click (Windows) or Control-click (Mac) near any of the Shutterfly Upload bubble icons in the Publish Services panel, and select "Create Another Publish Service via 'Shutterfly Upload'..." from the menu.
Edit a Publish Service
To edit an existing Shutterfly Upload publish service, right-click (Windows) or Control-click (Mac) near its bubble icon in the Publish Services panel, and select "Edit Settings..." to open the Lightroom Publishing Manager. Here you'll be able to change the publish service description and Lightroom's image rendering options. If seamless sign-in is not enabled, you'll also be able to perform password maintenance for the associated account.
You may not change the Shutterfly account a Shutterfly Upload publish service is associated with once the service has been created. If you need to publish to a different account, please create a new Shutterfly Upload publish service
Delete a Publish Service
To delete a Shutterfly Upload publish service, and any published collections it contains, right-click (Windows) or Control-click (Mac) near the service's bubble icon in the Publish Services panel, and select "Delete Publish Service...".
Deleting a publish service does not remove any images that have already been published to Shutterfly. Please visit the Shutterfly web site if you want to delete any unneeded images.
Published Collection
Publish a Collection
Add photos to be published by dragging-and-dropping them in your published collection. In the case of smart published collections, your images will be automatically added based upon the rules you defined.
When you select a published collection, the images it contains will be displayed, organized in the following categories:
- New Photos To Publish
Photos that have not been exported to Shutterfly yet. - Published Photos
Photos that have not been changed since they were exported to Shutterfly. - Modified Photos To Republish
Photos that have been edited since they were last exported to Shutterfly. - Deleted Photos To Remove
Photos that you have asked Lightroom to remove from the published collection.
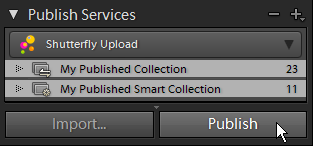
To perform the publishing operation, select one or more published collections in a given publish service and press the "Publish" button. Any photos that are in the "Deleted Photos To Remove" category will be removed from the collection, and those in the "New Photos To Publish" and "Modified Photos To Republish" categories will be exported to Shutterfly and moved to the "Published Photos" category.
Note that "Modified Photos To Republish" photos do not replace the images previously exported to Shutterfly. Instead, the images are duplicated in your Shutterfly album. During the publishing operation, you will be given the opportunity to skip any images marked for republishing to avoid this duplication.
Similarly, photos in the "Deleted Photos To Remove" category are only removed from the Lightroom collection -- they will still exist in the associated Shutterfly album. Visit the Shutterfly web site if you want to delete any unneeded images.
Create a Published Collection
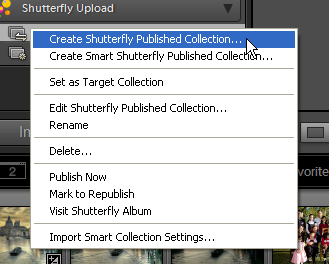
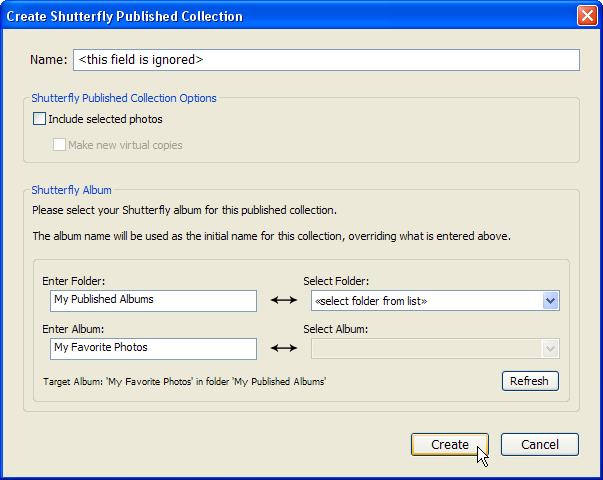
To create a new published collection, right-click (Windows) or Control-click (Mac OS) on the Shutterfly Upload service in the Publishing Service panel, and select "Create Shutterfly Published Collection..." or "Create Smart Shutterfly Published Collection..." from the menu. Select the Shutterfly album that will be associated with this published collection and press the "Create" button.
If you're creating a smart published collection, you'll also be able to define the rules governing what images are added to the collection. Please refer to Lightroom's documentation for more information about smart collections.
Initially, the published collection will be named to match the album you choose, however you may change it later if you wish. The "Name:" field in the "create" dialog is ignored.
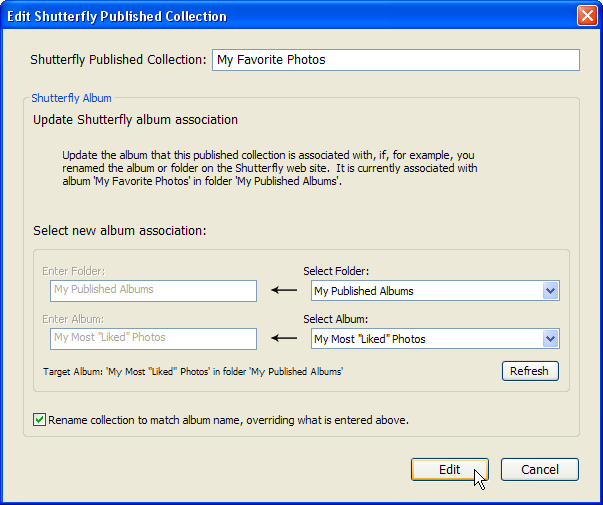
Edit a Published Collection
To edit a published collection, right-click (Windows) or Control-click (Mac OS) on the collecton, and select "Edit Shutterfly Published Collection..." (or "Edit Smart Shutterfly Published Collection...") from the menu. You'll be able to change the collection's name, the Shutterfly album it is associated with, and any smart collection rules. When you're finished with your changes, press the "Edit" button.
Generally, you shouldn't change the collection/album association once the published collection is created. However, the ability to do so is provided in case you rename your album on the Shutterfly web site and want to maintain the existing association. You may only change the association to an existing album.
Delete a Published Collection
To delete a published collection, right-click (Windows) or Control-click (Mac OS) on the collecton, and select "Delete..." from the menu. If you're sure, press the "Delete" button.
Deleting a published collection does not remove any images that have already been published to Shutterfly. Please visit the Shutterfly web site if you want to delete any unneeded images.
Mark Images as Published
There may be times when you would like images to be considered as having been successfully published, without having to export them to Shutterfly. For example, if you create a new Published Collection that is associated with an existing album that already contains photos, you may want to add those photos to the published collection and mark them as "published" so the Lightroom collection and Shutterfly album are synchronized.
To mark images as published, first select the collection in Lightroom's Publish Services panel. Then choose the images to mark and select "File > Plug-in Extras > Mark as Published to Shutterfly". All of the images you select must exist in the same Shutterfly Upload published collection. The action can be undone by selecting "Edit > Undo Mark Shutterfly Upload images as published".
Metadata
Overview
When you export images to Shutterfly, the plug-in adds information to the Lightroom catalog for those images that is visible in the Lightroom metadata panel and can be used as a filter for creating Smart Collections, or for searches. The information saved includes:
- the upload status,
- the Shutterfly user ID active at the time of upload,
- the Shutterfly folder and album names the photo was uploaded to, and
- the upload date and time.
If a given image is exported to Shutterfly more than once, the metadata reflects the status of the most recent export.
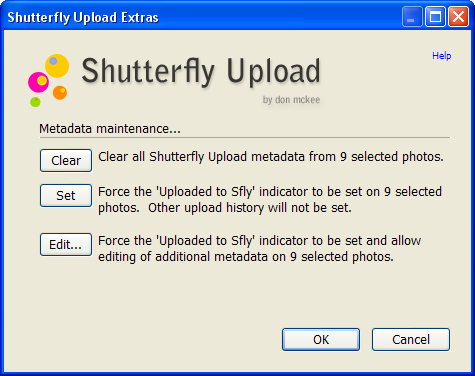
Maintenance
Some basic metadata maintenance can be performed using the "Shutterfly Upload Metadata..." panel, accessible from Lightroom's "File > Plug-in Extras" and "Library > Plug-in Extras" menu options.
The options on this panel give you the ability to:
- remove the Shutterfly Upload metadata from the selected photos,
- set the Shutterfly Upload status flag for the selected photos, and
- edit some Shutterfly Upload metadata fields for the selected photos.
These actions can be "undone" using Lightroom's standard undo capability ("Edit > Undo [...]") if the undo is performed immediately.
What's New
Changes Since V1.3
The following are highlights of the major changes and bug fixes made since the previous version. Refer to the change log file packaged with the plug-in for additional information.
New Features
- Publish Service support
- Seamless sign-in (optional)
- Shutterfly folder support
- "Help" integration to the Plug-in Extras section of Lightroom's main "Help" menu
- "Help" links on various UI dialogs
- New plug-in configuration options via plug-in manager dialog
Changed Features
- If a password has been stored for a user ID, it will be used automatically for any export or publishing operations that use that ID (including exports initiated via a preset).
- Passwords saved with presets created by prior versions of the plug-in will not be recognized. Please utilize the new password storage facility, or enable seamless sign-in, and update your presets.
- During export or publishing operations, the account login status will be left the way that it was found, e.g. if the user was already logged in at the start the operation, he will still be logged in when the operation completes.
- The "Visit Shutterfly" export post-processing action now opens your browser to the export target album. Prior versions of the plug-in opened to the album list of whatever Shutterfly account the browser may have been logged in to.
Bugs Fixed
- Fixed a bug that prevented the "show log file" action in in the plug-in manager from working on Lightroom v3 or later.
- Removed the use of some unsupported functionality that broke the metadata maintenance extras when running on Lightroom v4.